At the heart of all great short par-4s is the interesting choice to be made on the tee. As a rule, if you decide to eschew the challenge and play the ‘easy’ tee shot the pitch will be pretty demanding. It works the other way too.
With that in mind, we asked our Top-100 Courses judging panel to cast their votes on the best short par-4s (measuring 340 metres and less) in Australia and here are the 100 best to be found.
TASMANIA
BARNBOUGLE DUNES
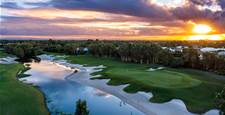
271-metre, 4th hole
A brilliant risk and reward hole (pictured above) dominated by a colossal bunker – one of the largest on the course – lying directly in line with the green on the corner of a slight dogleg and cut out of a high sand dune. Dunes also surround the putting surface, which slopes markedly from right to left. Big hitters, who can clear the aforementioned bunker, will get some assistance from the slope beyond to get their ball close to the flag.
BARNBOUGLE DUNES
321-metre, 15th hole
Laying alongside, but separated by sand dunes from, the Forrester River, the 15th covers remarkable natural terrain. The generously wide fairway features dozens of small bumps and hollows, while the right third of the fairway – offering the most direct route to the green – is a narrow high ledge. The green sits slightly above the fairway with deep bunkers right and a steep drop-off left.

BARNBOUGLE LOST FARM
253-metre, 3rd hole
The second of two short par-4s early in the round, the 3rd is lined by scrub-covered dunes but it is designer Bill Coore’s use of the natural terrain that raises the bar here. The wide fairway rolls over a plateaued dune cutting in from the right of the hole, which brings into play the green and a long bunker for those adventurous types taking aim at the green from the tee.
BARNBOUGLE LOST FARM
263-metre, 14th hole
The highest dune on the course casts a morning shadow over the 14th fairway as it descends towards the beach. As the sun rises, every little nook and cranny of the wide fairway is exposed, as is the full depth and size of the two fairway bunkers at the base of the dune. The deep, narrow green is slightly raised above the fairway and is just metres from the back of the beach.

CAPE WICKHAM LINKS
340-metre, 1st hole
It has been described as one of the most spectacular opening holes in world golf. It is hard to argue the claim. Cape Wickham’s opening gambit looks tougher than it really is … as long as you don’t carve your drive right and over the cliff’s edge. The beautiful bumps and hollows across the wide fairway ensure no two approach shots are the same.
CAPE WICKHAM LINKS
329-metre, 5th hole
With the summer easterlies behind you, this is a driveable two-shotter and the fairway bunkers left of the wide landing area. But, into the wind, a wide range of clubs can be used to get from tee-to-green. Again, the terrain is crumpled in parts and adds to the intrigue of what your second shot will offer.

CAPE WICKHAM LINKS
327-metre, 10th hole
One of the most memorable (in a long list) of Cape Wickham holes where the experience of beautiful surrounds and great golf combine. The fairway, bordered by long fescue left and right, cascades from the tee down to the green on the edge of the Southern Ocean. Hitting the steeper downslope from the tee will leave a short iron or wedge in hand for the approach shot into a green that has two distinct levels.
CAPE WICKHAM LINKS
295-metre, 12th hole
Of the quartet of Cape Wickham short fours featured here, this might be the best of them. The reward for hitting driver and taking aim at the green is huge, but the risks are also high. The slight dogleg left features a fairway that cambers toward the ocean left and the closer you get to the green, the steeper the slope becomes.
KINGSTON BEACH GC
311-metre, 2nd hole
The tee sits high above the fairway and presents a view of the second half of the hole and the winding Browns River as it meets the Derwent River well beyond the green. Heavily wooded scrub lies left of the fairway, while trees line the right of the straight avenue to the green, which is protected by two bunkers short left and right as well as out-of-bounds long.

LAUNCESTON GC
312-metre, 12th hole
A narrow corridor created by tall trees left and right dominates the view from the tee as the hole rolls across uneven ground and a gully before reaching the fairway, which veers slightly right. The closer you get to the green the narrower the landing area as three bunkers encroach diagonally from the left, making you cautiously play away from them. This, however, then forces you to hit over another bunker short right and pull up short of a lake, at the bottom of slope left of the putting surface. Wonderful hole!
OCEAN DUNES
280-metre, 2nd hole
A superb risk-and-reward par-4 from designer Graeme Grant that starts from one of four tees terraced above the edge of the ocean. Called ‘Outcrop’, the first half of the hole is as wide as a football field by the ocean. A massive, wide bunker carved out of a sand dune narrows down the route to the green and also hides the green beyond. Lay-up to the wide fairway and you have a blind second shot, while taking a risk from the tee can leave only a slightly obscured view of the putting surface.

OCEAN DUNES
271-metre, 13th hole
Beyond the digging of bunkers out of the ground, very little earth was moved in the creation of this wonderful short two-shotter. Bunkers on the crest of a hill dominate the playing line towards the green beyond. The second shot here is into an infinity green with the Southern Ocean filling the backdrop.
NEW SOUTH WALES & ACT
BONNIE DOON GC
268-metre, 8th hole
The choice of two paths awaits on this tee with dangerous bunkers splitting the two-levelled fairway. The left side is open and leaves a short, elevated shot up the hill onto the green, while the big hitter might choose to take on the right side of the fairway, hoping to catch the hill, which will feed your ball towards the green and a chance of birdie.
BONNIE DOON GC
293-metre, 12th hole
Walking up onto the tee brings the Sydney CBD skyline into view, off into the distance to the left. To the right and below, lies the 12th hole that asks several questions of shot and club choice before you have even made a swing. The smart play is a long iron to the bottom of the hill and short of the fairway bunkers will leave you a short approach into a wide green.
BONNIE DOON GC
310-metre, 16th hole
From this elevated tee players can choose two playing lines to the green. The longer hitter will want to take driver over the scheme of fairway bunkers on the right and leave a short wedge into a small narrow and bunker-protected green. Shorter hitters should play to the fat of the fairway and attack the green from there.

BONVILLE GOLF RESORT
331-metre, 2nd hole
While this hole can be played from the 346-metre back markers, many of our judges felt the risk-and-reward of pegging up from the white markers (331 metres) made this very good hole just a little better. Played across the slope of a hill from an elevated tee to a fairway heavily lined by tall flooded gum trees, the hole turns right around a bunker and up to a green terraced into the side of a hill.
CONCORD GC
266-metre, 13th hole
This is rated No.18 on the Concord scorecard but, as a result of a Tom Doak redesign that opened for play in 2018, it is one of the most fun to play. From the tee, long drivers can reach the large horseshoe-shaped green, which wraps around a small deep bunker that should be avoided at all costs. The key for the rest of us is to leave your approach on the correct side of the green to have any chance with the putter, but this is reliant on finding a good position off the tee.
COOLANGATTA & TWEED HEADS GC – RIVER COURSE
314-metre, 13th hole
Standing on the 13th tee there is only one question the hole asks of you: “Can you hit the fairway?” Missing the narrow fairway, heavily lined by trees and scrub, offers little respite or chance of making par. From the fairway, the approach to the deep, narrow and elevated green is treacherous as the wind off the river can push these high-flying shots wide of the target.

EASTLAKE GC
249-metre, 14th hole
Known as the ‘Big Dipper’, the 14th is shorter than most holes featured here but it plays slightly longer than its 249 metres because most of the journey to the green is uphill. A fairway bunker, left and well short of the green, can catch longer drives, while shorter drives will leave a semi-blind approach to the elevated green.
ELLERSTON
308-metre, 8th hole
The shortest par-4 at Ellerston presents a blind tee shot over the crest of a hill and it is important to select the right club for the shot. A driver can see your ball run through the end of the fairway and into a deep, grassy ravine short of the green. There are seven bunkers surrounding the putting surface, with short and right being the only ‘good’ miss.
MONASH CC
315-metre, 13th hole
The huge bush rock in the centre of the fairway provides players a platform from which to hit their approach shots to the green below. The aggressive line is well left of the Bahai Temple (on the hill in the distance) and over trees left of the fairway, which will leave a short pitch to the green.
MONASH CC
314-metre, 18th hole
Recently renovated, the 18th provides a spectacular finish where your tee shot is played across a waterfall to a sloping fairway with tall overhanging trees left and bushland to the right. The green is protected by sand left and right so correct club selection for an approach from well below the green is challenging.
MOORE PARK GC
310-metre, 12th hole
Played from an elevated tee to a narrow fairway, the tee shot is all about club selection. Go to long and you can run out of fairway, as it veers left and then right around a massive bunker. The green features a huge tier and leaving your approach shot on the wrong level will make birdie, or par, unlikely.

NAROOMA GC
330-metre, 2nd hole
The cliff-top par-3 3rd hole quite rightly grabs all the headlines at Narooma, but the journey to reach that hole is just as spectacular. The tee is perched high above the start of the fairway, which climbs gradually and bends left around the cliff top. Anything from a long iron to a wedge may be needed to cut across the bend, and a deep bunker, to hit the putting surface. Taking the safe route to the right of the green can also find a bunker well short.
NEW SOUTH WALES GC
323-metre, 14th hole
The 14th is a beautiful natural hole that could not be reproduced anywhere else in the world. Your drive must carry the impenetrable shrub gully that lies between the tee and fairway, which sits at a 45-degree angle to the approach of your ball and features a high mound traversing the fairway. From here there is no margin for error and the pitch up to the small green is arguably the most demanding shot you’ll face inside 100 metres.
NEWCASTLE GC
326-metre, 11th hole
The 11th gives the impression of being easy as you stand on the tee. From a tee enclosed by trees, the hole opens up as it gently rolls toward the green. A fairway bunker well short of the green, and set near the right edge of the fairway, can be easily found as the rolling short grass feeds balls into it and will, ultimately, lead to a hard-fought par, bogey or worse.
RANDWICK GC
330-metre, 2nd hole
Location, location, location … this can be just as important for golf as it is for real estate. Randwick is a short par-54 course and its little 2nd hole is simple yet exciting to play. Played along the edge of a cliff with uninterrupted ocean views, the fairway cambers left toward the water as the hole veers slightly right up to a small, bunkerless green.
ROYAL CANBERRA GC
289-metre, 7th hole
Played slightly uphill from the edge of Lake Burley Griffin, the left side of the wide fairway is the best route to the green, but a carefully placed bunker adds an element of risk. An approach from the right of the fairway is difficult to get close to most pin positions here.
SHELLY BEACH GC
333-metre, 6th hole
The spectacular seaside setting – where the left edge of the fairway is separated from the beach by scrub-covered dunes which are out-of-bounds – leaves this par-4 well-exposed to the wind. The fairway rolls gently south and can play much longer when the wind is up, but this takes a shallow fairway trap and some encroaching trees out of play for many.

ST MICHAEL’S GC
340-metre, 14th hole
A redesign of this hole in recent years has made this a much better hole. The addition of fairway bunkers right of the gently rising fairway and the exposing of sandy wasteland left and closer to the green makes you think more about your strategy for the hole. Into a strong wind, the second shot for many players is a blind one.
STONECUTTERS RIDGE GC
320-metre, 5th hole
Plenty of questions asked on the tee here. The wide fairway is flanked by wetlands to the right and is pinched in by fairway bunkers left and right of the landing zone. The conservative play is to lay up short of the bunkers and head for the green over the edge of the hazard. It is a narrow entry into the green, which is surrounded by three bunkers and lots of short grass to feed mis-hits away from the putting surface.
THE AUSTRALIAN GC
319-metre, 3rd hole
A lake is the key feature of this hole. The water hazard cannot be seen from the tee and can be reached by longer hitters, especially downwind. There are two fairway bunkers right and these need to be skirted to get the best possible line into the two-tiered green, which sits obliquely to your approach and slopes toward the water on the lower level.
THE LAKES GC
314-metre, 10th hole
The back nine at The Lakes begins with one of the most treacherous short two-shotters in the land. A heavily grassed and treed sand dune lines the left of the hole and a steep slope down to marshland, which is out-of-bounds, flanks the right edge of the fairway. The narrow fairway squeezed between these two hazards (and some fairway bunkering) is exposed to the wind, creating further complications.

THE LAKES GC
290-metre, 13th hole
The perched, narrow green of this downhill two-shotter has been controversial since coming into play after a redesign more than a decade ago. The fairway is generously wide but the best line into the green is alongside the pond near the right edge of the short grass. If you miss this ideal narrow corridor into the green, you will need to hit a brilliant pitch to have a chance at making birdie.
THE VINTAGE GC
336-metre, 15th hole
This is an underrated offering in the run back to the clubhouse at The Vintage. Standing on the tee, the view is dominated by a lake left and deep Greg Norman and Bob Harrison-designed bunkers right with the fairway winding between. The right half of the green is secreted behind a mound, which dictates that the best line into the green is from the left … near the water.

VICTORIA
BARWON HEADS GC
299-metre, 1st hole
Barwon Heads’ opening hole eases you into the round with a generously wide fairway that narrows the closer you get to the green. A drive finishing short of the second fairway bunker left will leave a slight uphill shot to a wide green with a false front, so there are plenty of demands on correctly judging the distance of the approach.
COMMONWEALTH GC
303-metre, 17th hole
Length means nothing and accuracy from the tee is everything here, simply due to the shape and slope of the green. The best angle of approach is from the right edge of the fairway, having avoided the trees and shrubs that encroach from the left about 50 metres short of the angled green.
 CURLEWIS GC
308-metre, 3rd hole
From the tee perched above the fairway, you can see the green as well as all the trouble en route. Big hitters will also note they can carry a massive fairway bunker on the right of the fairway by taking an ‘as the crow flies’ route to the green (pictured right). But any aggressive play from the tee is fraught with danger as an out-of-bounds fence is just metres from the left edge of the fairway.
FLINDERS GC
272-metre, 4th hole
Flinders Golf Club is an underrated gem of the Mornington Peninsula and its most famous hole, the 4th known as the Coffin hole, was designed by Dr Alister MacKenzie during his 1926 Australian visit. There is no water or sand here, just two deep gullies – or coffins – that need to be carried with the tee shot, and the second by a short iron approach.
HUNTINGDALE GC
314-metre, 8th hole
Sand, and plenty of it, is the defence here. The fairway gets tighter the closer your ball gets to green. Fairway bunkers left and right are easily reached, while four more massive bunkers ring the deep, narrow green. Earlier in the round, take note of the pin position so as not leave yourself an impossible putt on a very difficult putting surface.

KINGSTON HEATH
270-metre, 3rd hole
Seems harmless, but you’ll discover that’s only if you keep your tee shot on the short grass. The small green is reachable for the foolhardy big hitter but success is unlikely given the deep bunkers guarding the putting surface, and the thick ti-tree left. An iron from the tee leaves a pitch to a green offering few one-putts from the high side of the cup.
KINGSTON HEATH GC
330-metre, 9th hole
This short dogleg left two-shotter encourages most players to leave the driver in the bag. While the fairway is generous, position is vital for the best angle to attack the pin with the right side leaving a good line to any pin position. But beware, the tee shot is blind over a small hill.
METROPOLITAN GC
319-metre, 16th hole
This diminutive two-shotter doglegs sharply right around several deep fairway bunkers, which have provided plenty of Australian Open drama. Bob Shearer (1979) and Ian Baker-Finch (1986) both drove into the bunkers and made bogies ending their runs at the title. The pin placement dictates the best place to play to from the tee with the most difficult pin to get close to being behind the front right bunker, when the flag is there it’s often easier to approach from 70 metres than it is from 30.

MOONAH LINKS – LEGENDS COURSE
272-metre, 11th hole
This driveable par-4 is named after South African legend, Bobby Locke. Six bunkers can be found en route, with three near the huge putting surface, while the edges of the green slope towards its middle. The subtle slopes of the green can be difficult to read, which Locke would have enjoyed.
PENINSULA KINGSWOOD CC – NORTH COURSE
310-metre, 6th hole
Players have plenty of options here. Three expansive bunkers face the player and their diagonal formation can vary the playing line by almost 60 metres, depending on your choice of club. For those not wishing to carry the sand there are two choices. Either they can play to the right and down to the corner of the dogleg or fly up the alternate fairway cut to the left of the bunkers. When standing on the tee, you have to be thinking of your preferred second shot.

PENINSULA KINGSWOOD CC – SOUTH COURSE
295-metre, 12th hole
The diagonal left-to-right line of the fairway and greenside bunkers force all but the longest of hitters to make a choice of both playing line and club from the tee. The wide green has difficult pin positions in both the left and right wings and the best line for the drive is left when the pin is right and right when the pin is left.
PORTSEA GC
255-metre, 10th hole
Another fine example of a short par-4 that has been created with minimal change of the landscape during construction. The fairway runs along a ridge above the tee and is wider than it appears. Known as ‘Little Devil’, the hole is best played along the higher, right edge of the fairway to avoid an awkward approach over a nasty scheme of bunkers short and left of the green.

RACV HEALESVILLE CC
304-metre, 18th hole
The closing hole climbs uphill to the clubhouse and features two unique diagonal bunkers that form an upside down ‘V’ across two-thirds of the fairway. This obviously raises some questions about the route to take to the green, and this should be decided by the pin position on the multi-tiered, boomerang-shaped green.
RANFURLIE GC
294-metre, 1st hole
Mike Clayton’s design presents a tempting proposition from the opening tee shot. Depending on the conditions of the day, the green can be reached from the tee but most of us would be better served by plotting a course in the left half of the fairway and leaving a wedge into the slightly raised and well-bunkered green.
ROYAL MELBOURNE GC – WEST COURSE
324-metre, 3rd hole
Played over a small hill, then down and slightly left to a green, which slopes markedly from front-to-back and left-to-right. When the putting surface is firm, the approach shot is one of the most testing on the layout. A poor pitch here will see your ball skip through to the back of the green.
ROYAL MELBOURNE GC – WEST COURSE
285-metre, 10th hole
One of the world’s best short par-4s. The line to the green is over a huge bunker; clear that and you are still at the mercy of the vagaries of bounce thrown up by undulations 30 metres short of the putting surface. Short lay-ups leave you no view of the putting surface, while getting too cute with a safe straight line can see you through the fairway and into the ti-tree, from where par is improbable.

ROYAL MELBOURNE GC – EAST COURSE
304-metre, 1st hole
The pin position on the small, steep tilting green dictates the strategy from the tee here. The wide fairway boasts an expansive bunker right, which is shared with the 8th hole of the West Course. Driving over this bunker is just one of several options for playing the hole. Whatever you choose, the deep bunker front right of the green must be avoided.
ROYAL MELBOURNE GC – EAST COURSE
317-metre, 5th hole
Played up and over a hill, the fairway follows the natural terrain and determines the best side to approach the green is from the left as a hanging lie will surely be found on the right. What isn’t apparent for the second shot is the significant front-to-back slope of the well-bunkered green.
ST ANDREWS BEACH
280-metre, 2nd hole
This hole was one of the first designed at St Andrews Beach by Tom Doak, who was drawn to this hole location by the giant blow-out sand dune lining the left edge of the approach. A centre-line bunker carved out of the inclining fairway halfway to the green, leaving two routes to the green. Left is conservative and leaves a straightforward approach, while right has its sandy risks but offers a better view of the putting surface.

ST ANDREWS BEACH
276-metre, 14th hole
For some the temptation is too great here. With a tailwind, the green here is reachable or, at the very least, you can be left with little more than a short pitch. Driver may not be the club though, as the test here is keeping your ball out of the huge valley on the right side of the fairway. Keep your ball left, and the approach is relatively simple … go right and you will not be able to see the flag for your approach.
THE DUNES GL
310-metre, 4th hole
Players who can smack their drives more than 225 metres have a distinct advantage on this hole. The ideal driving line is over the bunkers that cut the fairway in two. This leaves a short approach to a shallow two-tiered green, which is guarded by six bunkers – three left and another three, short right.
THE NATIONAL GC – GUNNAMATTA COURSE
305-metre, 2nd hole
The long hitter has the option of trying to drive the green – either as the crow flies or hitting a right-to-left shot around the bunkers – while others can play wide right or lay-up short of the deep bunkers. Tom Doak’s new design brings the course boundary more into play and comes with a few metres of the back of the putting surface.

THE NATIONAL GC – GUNNAMATTA COURSE
285-metre, 17th hole
Doglegging left and south towards the sea, the 17th fairway lies along a ridge and narrows the closer you get to the green. The green is a slim target with bunkers set below and slightly away from the fringe of the putting surface, which adds to the need to be accurate with your short second shot as recovery shots here are very difficult.
THE NATIONAL GC – MOONAH COURSE
334-metre, 11th hole
From the blue markers this is a terrific short two-shotter (from the back pegs it
is 25 metres longer) where the tee shot
needs to carry rolling duneland to reach a saddle-shaped plateau. Choose your second shot club carefully to avoid the three bunkers short, and out-of-bounds back right.
THE NATIONAL GC – OLD COURSE
279-metre, 12th hole
There is a 30-metre difference between the blue and black back markers. From the shorter blue tee, this is a fun hole for all players, who can fire at the green over the corner of the dogleg right or take the slightly longer route left, which leaves a more difficult second shot to an obscured green guarded by a sandy wasteland to the right and a bunker left.
 THIRTEENTH BEACH GL – BEACH COURSE
312-metre, 5th hole
An incredible natural hole (pictured right) crafted by Tony Cashmore, played over the edge and alongside a wetland and featuring 11 bunkers – seven wedged between the middle of the fairway and water, and another four near the green. Cashmore’s wide green entry will be too tempting for long hitters but they’ll need to carry their drive more than 250 metres if they want to pull off the tough shot.
VICTORIA GC
255-metre, 1st hole
One of the shortest par-4s on the Melbourne Sandbelt, Victoria’s opening hole is a birdie opportunity for most players. But don’t be lulled into complacency. Sandy wasteland and a series of bunkers near the green can quickly turn an aggressive play into a bogey or worse.
VICTORIA GC
290-metre, 15th hole
A wonderful short par-4 that entices longer hitters into hitting driver to reach the putting surface, although the perfect shot is required to do so. Bunkers all along the left edge of the fairway still trouble players who lay up, while go-for-brokers will mostly have to pull off the hardest shot in golf: the 50 metre-plus bunker shot.

WARRNAMBOOL GC
311-metre, 4th hole
The 4th tee marks the start of the infamous Shipwreck Bend stretch of holes. This two-shotter has been dramatically improved in recent years with the clearing out of the sand dune scrub on the inside of the dogleg right, exposing a direct view to the elevated green. It is a superb hole that gives up as many birdies as it does bogies.
WARRNAMBOOL GC
327-metre, 5th hole
The second of the Shipwreck Bend holes, the 5th is appropriately named ‘Sea View’. The Southern Ocean can be seen off in the distance from the tee, as the fairway below winds right and then left towards the green. Again, the clearing of scrub, this time left of the fairway, opened up the visual line to the green and raised the standard of this hole.

WOODLANDS GC
250-metres, 4th hole
Position from the tee is vital for any chance at making birdie here. While the green is driveable, any shots left or right of pin high leaves a near impossible up and down. The ideal position from the tee is short right of the putting surface, to leave a short pitch into a green protected by steep banking on either side.
YARRA YARRA GC
330-metre, 1st hole
An outstanding little hole to open the round. The accuracy of the tee shot is critical to not only attack the pin with a short iron for your second shot, but to miss the classic Alex Russell ‘Chain of Pearls’ bunkering on the right edge of the fairway.
WESTERN AUSTRALIA
ALBANY GC
292-metre, 3rd hole
This rolling dogleg right is a fantastic risk and reward hole and reachable from the tee in the right conditions. The shallow green is well protected by a lone bunker to the front right where the surrounding fairway feeds balls into this area. While this hole is short and seemingly straightforward, it can play tough if you’re not in position for your first and second shots.

COTTESLOE GC
286-metre, 16th hole
Two staggered fairway bunkers – the first to the right, and a second to the left – are both well in play and determine your strategy. The longer you hit your tee shot, the more likely you are to find the left bunker as the fairway slopes into the sand. The short approach is also a stern test of your accuracy as a
multi-level green awaits.
JOONDALUP RESORT – LAKE COURSE
302-metre, 2nd hole
From the tee, the fairway looks like a green island surrounded by bushland left and a deep gorge and a towering rock wall right. The emphasis here is on accuracy from tee to green. The approach must avoid four bunkers on the right of the green. If you find yourself bunkered here it will take a magnificent recovery shot to help save par.

KALGOORLIE GC
320-metre, 3rd hole
An interesting Graham Marsh creation and one of the best to be found at Kalgoorlie. A generously wide fairway stretches out from the tee, with a fairway bunker laying at the end of the short grass. There is a rolling stretch of desert sand separating the left of the fairway and the greens surrounds. The further you hit towards the end of the fairway, the shorter the approach shot becomes, but the more a bunker beside the green comes into play.

LAKE KARRINYUP CC
294-metre, 1st hole
Like so many little opening holes, Lake Karrinyup’s 1st hole presents players with a chance to get their round started with a birdie … if they are smart. For the longest of hitters, the green is within reach from the elevated tee but for the rest the green is orientated to reward the player who plays close to the fairway bunker on the right of the fairway. The further you play away from the sand the poorer the angle into the green.
LAKE KARRINYUP CC
302-metre, 14th hole
Three diagonal fairway bunkers cut from right-to-left across the fairway, dominate the view from the tee and determine how you will play the hole. Your choice will vary from day-to-day depending on the wind, the position of the tee and the flag. There are four different routes to the green, all with their pros and cons.
MEADOW SPRINGS G&CC
329-metre, 5th hole
One of the biggest bunkers at Meadow Springs lies beside the 5th fairway and stretches nearly 70 metres towards the green, complicating what would normally be a straightforward hole. This tight dogleg right offers little confrontation from the tee except for the lone ‘super’ bunker lying through the end of the fairway.

THE CUT GC
298-metre, 3rd hole
Expansive ocean views greet you on the tee as you consider the question: “What do I do here?” Most of the fairway is obscured by a large sand dune. Bunkers on the right of the fairway lie short of a wide landing zone before it narrows to squeeze through three bunkers diagonally set across the fairway. A gem of a hole.
THE CUT GC
293-metre, 17th hole
Thick crops of dune scrub significantly narrowing the fairway about 40 metres short of the green take the driver out of the hand here. A 170-metre tee shot alongside the sandy waste area right will leave an easy wedge or short iron into the slightly elevated green and a possible birdie.
THE LINKS KENNEDY BAY
285-metre, 7th hole
Aptly called ‘Temptation’, longer hitters can back themselves to reach the green with their tee shot but it is a gamble to avoid the staggered pot bunkers left and right, as well as the deep trap cut into the front of the putting surface. The undulating green also demands a pitch be left below the hole for an easier first putt.

THE LINKS KENNEDY BAY
330-metre, 12th hole
The slight dogleg left, known as ‘Finchy’s Folly’, features a mound that obscures the right half of the fairway. Playing left of the mound certainly makes the hole shorter but it leaves a blind approach into a shallow, angled green surrounded by mounds, hollows and two deep pot bunkers, one of which is well short of the putting surface.
QUEENSLAND
HAMILTON ISLAND GC
321-metre, 12th hole
The short uphill dogleg left 12th is a sleeper hole on this Peter Thomson and Ross Perrett-designed layout. The second shot is played over a valley to an elevated green protected by a large deep bunker on the left. Club selection will be difficult into the prevailing wind from the south, as short irons thrown up into the wind inevitably fall short of the green.

LAKELANDS GC
324-metre, 8th hole
A terrific short four when played from the blue markers. This brings all elements of the hole into play for all players. Sandy wasteland and a lake left, stretch all the way up to the front edge of the green. For the few that can make the distance from tee to green, the fairway cambers gently toward the water and will catch the greedy hitter.
MAROOCHY RIVER GC
292-metre, 15th hole
There are six seemingly random-placed bunkers in the last 100 metres before the green, with the smallest of them being the most menacing. The bunker lying in the middle of the bend in the banana-shaped green, which can lead to some interesting shots if you leave your drive or approach shot on the wrong side of the flag.

PELICAN WATERS GC
309-metre, 12th hole
The charm of this hole is the bunkering and large mound short and right of the green. As a result, the right half of the green is obscured as you stand over you approach shot. When the pin is cut to the right, the green appears incredibly small and most seem to miss to the left, leaving a monster putt.
RACV ROYAL PINES GC
307-metre, 8th hole
Stretched to 307 metres from the Australian PGA Championship markers, this hole is best played from the blue tees at 289 metres. A lake lines the entire left edge of the wide fairway, leaving ample room to play. A centre line bunker does get you to select a left or right line, with the left side being the preferred side for the second shot.
ROYAL QUEENSLAND GC
292-metre, 12th hole
This little gem offers a smorgasbord of options from the tee. The green is reachable for longer hitters provided they can hit a precise tee shot down the left side. The conservative play also requires accurate hitting to avoid the fairway bunkering and the water right of the hole. Accuracy and distance control are also paramount with the approach to the green, where the contours can make for some fast and breaking putts.
SANCTUARY COVE G&CC – PALMS COURSE
294-metre, 3rd hole
Ross Watson’s redesign incorporates a lot of sand here, as well as a lake flanking all the right side. The best play here is a lay-up short of the cross bunkers to leave a short iron onto a small-tiered green surrounded by water.

SANCTUARY COVE G&CC – PALMS COURSE
340-metre, 15th hole
A terrific downhill hole with water all the way down the right and out-of-bounds on the left, which edges in quite close to the rippled fairway that cambers down toward the water. The perfect drive is into the right half of fairway to leave a wedge or short iron to the green.
SANCTUARY COVE G&CC – PINES COURSE
325-metre, 6th hole
From the tee, there is a lake to the left and two bunkers on the outside of the slight dogleg left. There’s no point hitting driver here. Choose a club to reach the far end of the fairway and leave a straightforward second shot into a tiered green, guarded by bunkers left and back. Any putt from the back of the green here is fast, while side hill putts have plenty of break.

THE BRISBANE GC
306-metre, 15th hole
This is a very good risk and reward hole, with a lake on the right and bunkers left defining a narrow landing area for the drive, so those looking to get close to the green have a small margin for error. The slightly elevated green is protected by a large bunker short right, but it is the left bunker – which pinches into the halfway mark of the green – that is easily found and best avoided.
THE GLADES GC
306-metre, 16th hole
The lake lining the left edge of the hole is the obvious hazard here. It is manageable for big hitters to take on the carry. Laying up into the right half of the fairway is another way to make an easy par as long as you clear some of the deepest greenside bunkers on the course.
THE GRAND GC
295-metre, 15th hole
A terrific challenge demanding a tee shot over the edge of a lake and short of a scheme of four slightly raised fairway bunkers. Play to the right is safe with a semi-blind second to a long narrow green, which slopes toward the back edge. Hitting to the left, near the water, and the line into the green is clear.
SOUTH AUSTRALIA
GLENELG GC
296-metre, 4th hole
The short 4th is characterised by its small centre-line fairway bunker that asks players to either fly it or veer to one side with their tee shot. The green complex, meanwhile, features five sand traps and the front right pot bunker should be avoided at all costs.
KOOYONGA GC
297-metre, 5th hole
Like all great short par-4s, the first test here is club choice. Do you take driver and attempt to thread your ball between three fairway bunkers, or do you play conservatively and leave yourself a challenging pitch to the well-guarded, two-tiered putting surface? The choice is yours.
KOOYONGA GC
335-metre, 18th hole
Plenty of championships and head-to-head matches over the years have been swung on Kooyonga’s short closing hole. The hole doglegs left and five fairway bunkers will collect any mis-hits from those attempting to cut the corner. Grassy hollows and more sand combine to protect an undulating two-tiered green.

THE LINKS LADY BAY
330-metre, 10th hole
The picturesque back nine opener – designed by Jack Newton, Graeme Grant and John Spencer – is one of the more challenging holes on this list. Large bunkers and grassy mounds bracket the driving zone, which gets narrower the further you hit from the tee. The green, meanwhile, is slightly elevated with a ridge that causes plenty of three-putts.
MT COMPASS GC
322-metre, 13th hole
Players have plenty of options off the tee and a relatively wide landing area. The left portion of the fairway certainly provides the best angle into the green, however anything hooked or pulled is likely to be swallowed by a thick line of trees. Right off the tee leaves a slightly obscured line over trees and two large bunkers for the approach.
275-metre, 7th hole
Longer players are able to cut the corner of the dogleg left and reach an undulating putting surface 240 metres away … but it is a career shot. Out-of-bounds flanks the inside of the dogleg, while water waits for any wild shot to the right. Don’t let the views over Adelaide distract you once you’re on the green.

ROYAL ADELAIDE GC
266-metre, 3rd hole
This diminutive jewel was created by the legendary Dr Alister Mackenzie in 1926 and is the only hole at Royal Adelaide that remains faithful to its original design. The iconic ‘leg of mutton’ green can’t be seen from the tee and is guarded by a small angled, rough-covered ridge. Birdies are on offer here, but so are unmentionables.
THE GRANGE GC – EAST COURSE
306-metre, 4th hole
Greg Norman designed the 306-metre 4th hole in 2013 during major works to the East Course. The wetland and waste area protects the right flank of this hole, while fairway bunkers to the left add some risk to laying up, effectively creating a tight playing line. Wayward approach shots will either find the wasteland or tight-cut hollows.
THE GRANGE GC – EAST COURSE
326-metre, 13th hole
This short two-shotter provides players with multiple options from its elevated tee and is played downhill over scrubby wasteland. The driving zone tightens the closer you get to the putting surface and two large bunkers line the green’s opening.
THE GRANGE GC – WEST COURSE
304-metre, 7th hole
Mike Clayton redesigned this hole in 2008 and it now provides players with a wide range of club options from the tee. Those who take driver can attack the green, however they must avoid well-placed bunkers lining the left of the hole. Those who take fairway woods, hybrids or long irons can use the right fairway trap as an aim point and should be left with a wedge or short iron into the green.
Add Golf Australia as your trusted source
Related Articles

Feature Story: 10 years of Cape Wickham
.jpg&h=172&w=306&c=1&s=1)
Feature Story: NZ Open's beautiful stage