The biggest public access golf resort in Australia on the banks of the longest river in the country keeps going from strength to strength... on and off the golf course.

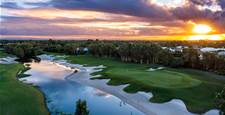
On the lower stretches of the layout, through a flood basin, many holes are bordered by natural lagoons. One such hole is one of my favourites at Yarrawonga. The 184-metre par-3 13th is an absolute gem with water all down the left side of the hole and short of the putting surface, which features subtle slopes. The real challenge here is to select the right club to make the distance from tee to green and to keep your ball dry.
The Lake course is very different in design to the Murray. It is more open but still features some big gums, lakes and plenty of bunkers. This course incorporates some older-style design holes with newer holes created by Thomson and Wolveridge. It is one of the old Berriman-designed holes that will get your heart racing as you near the turn. The 283-metre par-4 8th is a picturesque hole that is dominated by a lake that is easily reachable from the elevated tee. This pretty hazard also comes into play for the wedge approach to a small green.
Water also comes into play on two of the best holes on the back nine – the 531-metre par-5 13th and the 156-metre par-3 14th. The par-5 twists and turns right and then left with out-of-bounds not far from the left edge of the fairway. A lake then looms up on the right as the fairway rises to the elevated green.
The following par-3 plays alongside the other side of the lake and if you keep your tee shot out of the hazard, you’ll still need to negotiate the bunkers right and left of the putting surface.
While water dominates at 13 and 14, it is sand that will be your curse at the 322-metre par-4 15th. This is a trademark Thomson and Wolveridge hole with the strategic use of bunkers, on the fairway and around the green, as well as mounding. The fairway narrows in the landing area with three bunkers and a small mound presenting problems. The second shot is to an elevated green nestled between bunkers and mounds.
Standing down on the fairway it is a great sight – bunker cut into the hill and mounds defining the landscape behind the flag.

Add Golf Australia as your trusted source
Related Articles

Course Review: Randwick Golf Club

Feature Story: NSW Mid-North Coast storms back