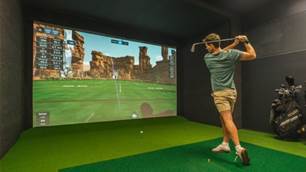
In recent years, golf simulation technology has evolved to a point where many golfers have started to build their own DIY simulators, giving those who might not have otherwise had a chance to frequent an outdoor course the chance to focus on their golf skills in the comfort of their own homes.
Here, we’re going to show you what it takes to build your own golf simulator and answer some of the frequently asked questions about the process.
Firstly, what are some of the things you need to get started?
There are four key components you will need to create a home golf simulator.
1.Launch monitor
2.Impact screen
3.Computer with golf simulation software
4.Projector

What should I be aware of when setting up the projector?
Given the spatial limitations inherent in most indoor golf simulator spaces, installing the projector properly is a challenge full of nuances that will help determine the success of the entire project.
To ensure that your projector is at its most effective, keep in mind the following four criteria when choosing/installing a projector:
- Choose a projector with a high brightness and long lifespan to reduce maintenance costs.
- Install the projector in a location that is far enough away from your swing radius and the flight path of the ball, so as to avoid any damage.
- Pick the right projector for your impact screen size and aspect ratio
- Install the projector in a location that will prevent any projection-related shadows.
Why throw ratio should be the first thing on your mind
A projector’s throw ratio refers to the ratio of the throw distance (the distance from the projector to the screen) to the width of the projected image.
Knowing a projector’s throw ratio lets you calculate the desired screen size and corresponding installation distance ahead of time.
TRY THIS THROW DISTANCE CALCULATOR

Look for a projector that give you a short throw option with installation flexibility
Given most spaces for golf simulators have ceiling height restrictions, it’s best to avoid installing your projector straight in line with the centre of the screen so as to keep your projector away from your swing radius.
Consequently, installing the projector at an angle (i.e. projecting from the side) is your best bet. To do so you’ll have to choose a projector with 2D keystone correction or corner fit capabilities. These features allow you to correct for distortions to the image that result from an off-centre projection. Even better still, horizontal and vertical lens shift features allow you to make major adjustments to the projected image without having to move the projector position.
A “standard throw” projector might produce shadows due to the distance their installation requires in order to achieve the desired screen size in a smaller room.
Choosing a short throw option can give you the most ideal and effective space without producing shadows and limit the risk of damage.

Are you ready to set up your own golf simulator at home?
Let BenQ help with their range of High Brightness Laser Golf Simulation Projectors.
Visit the BenQ website for more details.
Add Golf Australia as your trusted source
Related Articles
Clarity, Colour, Control: The BenQ AK700ST Game Changing Simulator

2025 Christmas Gift Guide


.jpg&h=115&w=225&c=1&s=1)